Wednesday 19 December 2012

18 Fullscreen video - hide everything accept the video player

Internet based videos need the option of playing full screen, I think that everyone expects this now. The player still needs to be accessible but nothing else on the page should be; links or any other items for example. 

Why should the user be able to tab to an item that is no longer needed if the video is playing full screen? Of course the answer is that they shouldn't, it is really confusing when it happens.

The video player being developed is currently in a <div> tag called #vidPlayerContainer. I want to keep that item visible and hide everything else. To do this I change the CSS display to none for all other objects. Doing this removes all of those items from the tab order.

To do that I used this nice piece of jQuery I found on Stackoverflow which does just that, it runs whenever the full screen mode changes:

$('body > :not(#vidPlayerContainer)').toggle();

The code says find anything inside the body and toggle it on or off as long as it is not #vidPlayerContainer. Pretty neat and a lot more concise than the horrible loops (and hoops) I was planning to jump through.

It's still possible, fortunately/unfortunately, to tab to the browser chrome in some browsers, which feels a bit annoying. I'll look into that further in the new year.

Happy New Year everyone.


Sunday 9 December 2012

17 Creating a new batch of subtitles

This week sees me doing a bit of subtitling work.

As mentioned in previous posts the best place (in my opinion) for creating subtitles for video (for free) is the Amara/Universal Subtitles site.

While saving my subtitles I noticed a small change - it is now possible to save the subtitles into different formats other than SRT. No unfortunately not WebVTT but it is possible to save directly into the required Flash subtitle format TTML.

One small subtitle conversion step removed from the subtitling process.

It keeps getting easier.

Thursday 29 November 2012

16 Converge 2012 eLearning Conference Presentation

Last week I presented a paper on the first stage of creating an accessible video player at the Converge 2012 eLearning Conference.

The discussion was about Stage 1 of this project, essentially providing captions for video, and focused on the topics:
  • Captions must be easy for people to implement
  • How are captions made available.
The second topic was easy enough; I went through the process of developing and implementing captions, it was quite dry and hopefully not overly technical.

After the presentation one of the delegates came up and started to discuss alternatives to the JavaScript used for Android and iOS device 'fixes'. He offered other alternatives that I thought were a bit more complex and would need some technical setup that mine didn't. He said that there was some JavaScript setup required in the alternative but he felt that my example already had JavaScript on the page so what was the difference. By it's mere presence it is perceived as too complex or technical.

I thought he had a point and I didn't have a reasonable answer other than any solution should produce/use  HTML5 'code' only with JavaScript in support. Using HTML5 on the page only will mean when HTML5 is fully implemented developers should only need to remove JavaScript from the page and not have to redevelop it.

When I thought about it more and looked at the JavaScript that was left in my example I couldn't see anything that the user/developer would need to change. This made me see my small mistake - there is no need for that JavaScript to be on the HTML page at all, it should be 'hidden' away in a linked file somewhere. Doing this removes all code from the page making it just that little bit easier. If it is visually easy to implement people won't be frightened off by it.

I need to remember this while working on this second stage of the project - get ALL of the code off the page if at all possible.


Thursday 15 November 2012

15 HTML5 video player - sync a second audio track

This week I am thinking about a second audio track for my video that provides audio descriptions for people with visual impairment.

To describe the problem that a second track would solve let's think about an actual classroom setting with a teacher demonstrating a task to a number of students. The teacher might say something like "Ok it is very important that you take this here and wrap it 5 times around this coil - but not the other coil. Before you turn it on make sure you press this button over here before flicking the power switch." Obviously the student can hear the teacher but might be stuck in the back of the classroom behind taller students and miss the visual information. If that is the case it is completely unclear what the teacher is talking about.

Many videos available online are excellent but every now and then slip into using non-descriptive words like 'this' and 'that'. If the user can't see what 'this' and 'that' are an otherwise excellent video can be rendered useless to them.

Early in 2011 Sylvia Pfeiffer at WHATWG and W3C were working on "... new HTML markup and a JavaScript interface for dealing with audio or video content that has more than just one audio and video track." Read the whole article: HTML5 multi-track audio or video.

This HTML markup should solve the problem of video with alternate tracks though it's not yet supported in current browsers. So what about now?

It turns out it isn't that hard to have a second audio track and to keep it relatively in sync with the video that is playing.

I have done it this way (basically):

  1. Place some video on a HTML5 web page (using the video tag of course... not flash :-) )
  2. Give the video tag an ID of videoTrack
  3. Now add the audio track to the web page also (for my test I stripped the audio from the video so I could confirm if the audio was in fact in sync with the video)
  4. Give the audio tag an ID of audioTrack
  5. Create a function in JavaScript that looks like the one below:
function syncTracks(){
   var audio = document.getElementById("audioTrack"); 
   var video = document.getElementById("videoTrack");
   audio.currentTime = video.currentTime
}

Pretty much as easy as that, set the current time of the audio track to the current time of the video.  Essentially all that needs to happen now is to call the syncTracks() function whenever the video is played, paused or stopped.

NOTE: The video controls should also control the audio playback.

There is a big BUT!

The currentTime property of the video only seems to start updating when the video is running for a short time. I found that the audio track and the video gets out of sync by about a second or so depending on how the user interacts with play and pause buttons.

To circumvent this I created a timer which is called when play is pressed. It waits for about a tenth of a second and THEN calls the syncTracks() function. This works much better. The sound is only ever a small fraction of a second out using this method.

Here is the timer I used:

setTimeout(function(){syncTracks()},100)

While this is not perfect it is better than the alternative of waiting for browser support for multiple tracks.


Thursday 8 November 2012

14 Accessible HTML5 video player project - subtitle choices

An accessible HTML5 video player should have subtitles - that's a given. But how should those subtitles be displayed? Should they just be white text on a black background?

Well, no.

What if the black background is covering an important occurrence in the video. The person will obviously miss it and not learn everything from the video they may need to. So should the background be transparent? By how much?

Even these few questions point to a need for subtitle settings.

The video player being developed in this project should have subtitle settings that can:

  • change background colours
  • adjust the transparency of the background
  • change the font type
  • change font colour
  • increase or decrease the font size.
Apart from the settings the subtitles should be movable and sizable. 

What else should subtitles do? Should there be an option of more than one subtitle track, for another language perhaps?

When the settings are open should they be keyboard and screen reader accessible, and should the controls of the video player itself still be accessible?

Lots of questions this week.

Wednesday 31 October 2012

13 Making an accessible HTML5 video player - first steps

Early attempts at making an accessible video player have been quite positive, buttons are working and are accessible with a keyboard and screen reader. There are no keyboard traps and the video player works in all HTML5 enabled browsers. Embedding the video player on the page is still quite simple and no special Javascript initialisation is required. There are no HTML5 tricks or work rounds required to get it to work.

So what have I learnt so far? I've learnt about fullscreen video playback.

An interesting point to note about video players in fullscreen.


Before this project started many different video players were reviewed. One in particular was found to be very accessible though not at all accessible in fullscreen mode. When the player was in fullscreen mode all controls disappeared and it was possible to tab to other items on the web page that were covered by the fullscreen video. This was very confusing but it is true of many video players and in fact many HTML items that are shown in fullscreen mode.

Problem number one for this project; how to turn off access to all other tab enabled HTML objects when the video is showing in fullscreen.

It turns out to be fairly easy, anything that has a CSS property of display:none is removed from the tab order.  Javascript is used to 'hide' all items that are not part of the video player in fullscreen mode and 'show' them when not in fullscreen mode. Currently JQuery's toggle function is doing this work.

The video controls that are part of your player also need to move depending on the current mode of the player. Currently the controls that are being used sit underneath the video when in normal mode but when the  player is set to fullscreen there is obviously no room for the controls to sit underneath. CSS is used to resize and move the controls when the video player enters and leaves fullscreen mode. Again the JQuery toggle function is used to achieve this.

I am sure that there are other ways of doing this and I leave this post thinking about my next internet search "Creating a modal window with Javascript'.


Monday 8 October 2012

12 Accessible Modern Video For All - Stage 2

Our team were pleased to receive funding for the continuation of the Accessible Modern Video For All project. This second stage will attempt to create an accessible HTML5 and JavaScript based video player for modern web browsers. This video player will be designed to meet accessibility standards including WCAG2 level AA.

While there are many video players available that are quite accessible none have been identified as being completely accessible to all users. These players may be missing some valuable information such as labels for controls, feedback on the position of sliders (volume or time), provision of colour, font and font size choices for captions. One excellent example appeared to be completely accessible except for feedback on sliders that was unclear and difficult to access and it was also unfortunately completely inaccessible when run in full screen mode.

Common HTML5 and JavaScript based video players can also be notoriously difficult for the layperson to include on the web page and may not meet the HTML5 standard (as it is at this point in time) at all.

Our plan is to keep it as easy as possible for everyone to implement and maintain a video player on a web page and to make that video player accessible to all. We hope to contain all JavaScript, that can confuse people, in external files and to use HTML5 markup only to keep implementation as simple as possible.

The video player will be tested with students who work in noisy environments, students who come from culturally and linguistically diverse backgrounds and students who may have hearing or visual impairments.

Our team is excited by this opportunity and we hope we are ultimately successful in providing an accessible modern video player for all.

Tuesday 22 May 2012

11 Thoughts on HTML5 video and subtitles

In due time, HTML5 will make the work of a web developer more efficient and effective. Once the final video format is chosen, embedding video in HTML5 webpages will become less complex.  In addition, the implementation of subtitles using the <track> tag will eventually require less or no JavaScript fixes.

In the meantime, a Flash fall-back will be necessary as IE8 is expected to be used widely until 2015 when Microsoft stops support for Windows XP and it currently does not support the <video> tag.

There is still some degree of complexity in creating subtitles, in that there is a lack of available software for easy and less time consuming file conversion to HTML5 compatible formats. However, this may change at some stage as the available features in Universal Subtitles/Amara were better than expected and have the potential to be developed further.

Google are currently working on providing subtitles in YouTube by developing voice recognition. However this needs further refinement as when voice recognition was tested with video accompanied by good quality audio; approximately 10% of what was said was correct. Discussion of these results can be viewed here: http://www.youtube.com/watch?v=krq1msguNFo.

It was not possible to locate information that indicated how iOS or Android will support HTML5/web based subtitles in the future. This was a little disappointing as these devices seem to be behind the rapid uptake of HTML5 among web developers. Perhaps changes will occur when the HTML5 specification is completed.

Currently there is a lack of tools that will create, or help to create, WebVTT format files. It is expected that this will change as the format is very similar to the fairly common SRT format and may not require major changes to existing software. Over the life of the project it has been noted that changes were still happening and there was an increase in available tools. (Such is the rate of change that the information in this document was frequently changed to include new developments.)

BubbleJS http://bubbles.childnodes.com/ provides a promising future for both triggering subtitles successfully and providing a high functioning video player. The BubbleJS player can trigger actions that happen outside of the video player such as opening, closing, animating, effecting colour changes etc. on other html objects. This is an excellent result for education in that it provides a video player with accessible video that interacts with other page elements to present information related to the video, in engaging and innovative ways. Hopefully the setup of BubbleJS becomes easier.

Working with video on the web has, over the years, become much easier and a lot of time savings can be found in good processes and work practices. Hopefully the time saved can be dedicated to the creation of subtitles and accessible video for all internet users.

Related posts:

Accessible HTML5 video for all
How to create a basic HTML5 webpage
Fall back to Flash
Current HTML5 subtitle support
Subtitle creation process
Link subtitles to video
Making subtitles work now
A Flash solution
Making it work now, on an Android device
Making it work now, on an Apple device
Thoughts on HTML5 video and subtitles - conclusion
10 Making it work now, on an Apple device

Apple iOS devices such as the iPhone, iPod and iPad work differently with video in web pages. Rather than playing the video directly in the webpage the video opens in the inbuilt iOS video player. This means that any subtitles provided by the web page will not be visible as the video is not displayed in the webpage.

The best way to provide a solution is to return to Handbrake so that subtitles can be directly encoded onto the video. This section will provide instructions on this process.

A video demonstration of the steps below is available here: http://www.youtube.com/watch?v=SiBJtF7bQOs

Step 1:
Encode the video with subtitles*. ( The subs.srt file will be used for this purpose)
  • Open the Handbrake application
  • Locate and use the original video file, do not use any of the videos previously encoded and compressed, using these videos would only produce a poor quality result as you would be recompressing an already compressed video.
  • Make the exported file name html5exsubs.mp4
  • Select the tab labelled ‘Subtitles’
  • Select the ‘Add External SRT’ button
  • Navigate to the ‘website’ folder
  • Choose the subs.srt file
  • Press the Start button to begin the encoding process.
  • When encoding is finished move the new MP4 file to the ‘website’ folder
Links to the completed videos and website folder can be found at the bottom of the page.


Step 2:
Link the new subtitled video to the webpage.
  • Change the first <source> tag from this
<source src="html5videoex.mp4" type="video/mp4" />
  • To this:
<source src="html5exsubs.mp4" type="video/mp4" />

Upload the new video file and the changes to the webpage and test the webpage on an iOS device such as an iPad.
  • Select the subtitles button when the video loads in the video player to see the encoded subtitles with the video.


NOTE*: Encoding subtitles directly into the video does not mean the HTML based webpage no longer needs the <track> tag. The above is a ‘fix’ for providing subtitles on an iOS device only.


It didn’t work on the iPad?

Not all versions of iPads are the same.  At the time of writing, iPad 1,2 and 3 were available. When testing the procedure outlined above, both iPad 1 and iPad 2 gave different results. On some iPads the video played well however on others there was a conflict between playr.js JavaScript library and the iPad, as playr.js JavaScript library tried to override the iPad in how the video was played.

This problem can be is solved by amending the JavaScript for Android so that subtitles are consistently available on iPad devices as per instructions below:

Step 1
Amend the JavaScript for Android in the <head> of the html5video.htm webpage so it appears as below:

<script type="text/javascript">
$(document).ready(function(){
if(navigator.userAgent.toLowerCase().indexOf("android") > -1) {
$("<div id='flashContent'></div>").insertBefore("video");
swfobject.embedSWF($("video object").attr("data")+"?", "flashContent", $("video object").attr("width"), $("video object").attr("height"), "9.0.0");
$("video").remove();
}

if(navigator.userAgent.match(/iPhone/i) || navigator.userAgent.match(/iPad/i) || navigator.userAgent.match(/iPod/i)){
$("video").removeAttr("class")
}
})
</script>

This JavaScript removes the ‘class’ attribute from the <video> tag that triggers the playr.js script to create the video player. This means that the video will display in the webpage as normal HTML5 video does on an iPad and the subtitles will be available when the video is played in the native iPad video player.

Related posts:

Accessible HTML5 video for all
How to create a basic HTML5 webpage
Fall back to Flash
Current HTML5 subtitle support
Subtitle creation process
Link subtitles to video
Making subtitles work now
A Flash solution
Making it work now, on an Android device
Making it work now, on an Apple device
Thoughts on HTML5 video and subtitles - conclusion

Downloads

09 Making it work now, on an Android device

Androids are more complex. The video opens in a native Android player and does not play in the webpage directly because the subtitle track is ignored by the internal Android video player. While it is possible to embed subtitles on the video (as described in the post Making It Work Now on an Apple Device) the current Android video player does not give the option of selecting them.

Therefore a Flash alternative that does supply subtitles is required. To supply the Flash alternative a Flash fall-back in the HTML5 <video> tag is needed in combination with a JavaScript fix that:
  • removes the <video> tag completely (which, as a by-product removes the HTML5 Flash fall-back)
  • re-embeds the Flash video.
In order to implement HTML5 and video in the easiest most conformant and future proof way, two JavaScript libraries were used;  SWFObject and jQuery, and a short customised script.


Note: Custom JavaScript could have been written to do everything mentioned above though it is easier to implement the proposed fixes using these common JavaScript libraries. JQuery is becoming more widely used and it is not unlikely that it is already available on the page that will hold the video that requires this fix.

Add the required JavaScript to the page

Step 1:
Download the required JavaScript libraries SWFObject and jQuery.
At the time of writing the current versions are SWFObject2.2 and jQuery 1.7.2 use the latest versions that you can find to ensure cross browser compatibility.

Step 2:
  • Place the JavaScript files into the ‘website’ folder*.
Note*: When the SWFObject folder is unzipped it creates a number of folders that contain examples of how to use it and 2 SWFObject JavaScript files. Both files will work though the one file that is used in the examples below is the minified version found in the folder: swfobject_2_2/swfobject/swfobject.js.
  • The files now in the ‘website’ folder should appear as below:
  • videoplayer.fla
  • videoplayer.swf
  • SkinUnderPlayStopSeekCaptionVol.swf
  • html5videoex.mp4
  • html5videoex.webm
  • html5video.htm
  • subs.vtt
  • subs.xml
  • playr.js
  • playr.css
  • images (folder)
  • jquery-1.7.2.min.js (or similar depending on current version)
  • swfobject.js (or similar depending on current version)
Links to the downloaded JavaScript files, videos and website folder can be found at the bottom of the page.


Step 3:
  • Open html5video.htm in a preferred web editor
  • Paste the following HTML into the <head> of the document above the playr.js link. Ensure that the same order as below is kept as it is important.


<link rel="stylesheet" type="text/css" href="playr.css" />
<script src="jquery-1.7.2.min.js" type="text/javascript" language="javascript"></script>
<script src="swfobject.js" type="text/javascript" language="javascript"></script>
<script src="playr.js" type="text/javascript"></script>


Step 4:
This step will:
  • include some custom code that inserts a flash object
  • use information from the flash fall-back in the video tag
  • remove the <video> tag completely
  • complete the process on an Android device only.
  1. Insert the code below between the swfobject.js and playr.js <script> tags.
The code below waits until the page is ready. Once the page is ready it looks for the Android* operating system (OS) and if it finds the Android OS it:
  • creates a <div> for the new Flash to be embedded in
  • embeds the Flash video into the newly created <div> using information that is obtained from the Flash fall-back in the <video> tag
  • deletes the <video> tag from the page as it is no longer required


<script src="swfobject.js" type="text/javascript" language="javascript"></script>
<script type="text/javascript">
$(document).ready(function(){
if(navigator.userAgent.toLowerCase().indexOf("android") > -1) {
$("<div id='flashContent'></div>").insertBefore("video");
swfobject.embedSWF($("video object").attr("data")+”?”, "flashContent", $("video object").attr("width"), $("video object").attr("height"), "9.0.0");  //all on one line.
$("video").remove();
}
})
</script>
<script src="playr.js" type="text/javascript"></script>


IMPORTANT NOTE*: For some reason Flash video does not work on Android in a Flash video player **unless there is a question mark (?) after the path to the Flash file. A question mark is used to send information from the web page back into Flash. This is why there is a question mark in the code above - ($("video object").attr("data")+”?”, – If variables are being sent to Flash from the standard Flash embed created in the HTML5 <video> tags it is wise to remove the question mark from the JavaScript code. Here is the amended code - ($("video object").attr("data"),


NOTE**: playr.js still runs though it does not find a <video> tag and does not initialize any code that causes confusion for the Android device.


Step 5:

Upload the website and test this on an Android device.

Related posts:

Accessible HTML5 video for all
How to create a basic HTML5 webpage
Fall back to Flash
Current HTML5 subtitle support
Subtitle creation process
Link subtitles to video
Making subtitles work now
A Flash solution
Making it work now, on an Android device
Making it work now, on an Apple device

Downloads

08 A Flash solution

Older browsers that don’t support HTML5 video need to use the Flash fall-back as described earlier for IE 6,7 and 8. Firstly the Flash video player needs to be altered to show subtitles. The steps below will update the videoplayer.fla and videoplayer.swf files.

There is a video demonstration of the steps below available here:
http://www.youtube.com/watch?v=HcG3L1P149U

Steps Comments
Open videoplayer.fla that was created earlier. This can be found in the ‘website’ folder.
Select the Text Tool from the toolbar – don’t draw a text box just yet. Setting the options before drawing the text box seemed to make a better result in Adobe Flash CS5. This is probably not important though it was frustrating.
Set these properties before drawing a text box:
  • Make the text box a Dynamic text box
  • Choose a readable font such as Arial
  • Set the font size to 16pt
  • Choose a bright colour such as white or yellow
  • Click on the ‘Character Embedding’ button
  • Choose ‘Uppercase’, ‘Lowercase’, ‘Numerals’, Punctuation’ and ‘Basic Latin’
When the text box, or text tool, is selected all of the text box properties can be located in the Properties panel.
Draw a text box at the bottom of the video player screen. Place it where subtitles usually appear.
Give the text box an instance name of subsText. When the text box is selected there is an ‘Instance Name’ option located in the Properties panel.
From the ‘Window’ menu choose ‘Components’.
Drag the FLVPlaybackCaptioning component to the left of the video. The positioning does not matter as the component is not visible when the movie is running; placing it off to the side of the video player keeps the work area clear.
Close the ‘Components’ window.
From the ‘Window’ menu choose ‘Component Inspector’.
Make sure that the FLVPlaybackCaptioning component is selected. Click on the component with the ‘Selection’ tool (Black Arrow)
Select the ‘Parameters’ tab on the ‘Component Inspector’ window.
Set the CaptionTargetName property to subsText This is the name of the text box created earlier.
Set the Source property to subs.xml subs.xml is the subtitle file created for Flash earlier.
From the menu choose ‘Control’ and then ‘Test Movie’. The subtitles should appear though they may be a little flat and not stand out as much as expected. One way to fix this is to attach a Drop Shadow filter to the text box.
Select the text box.
From the ‘Properties’ panel choose ‘Filters’.
Select the ‘Add Filter’ button at the bottom left of the panel. The icon looks like a piece of paper.
Choose Drop Shadow.
Save and test the movie again.
A Flash file that plays subtitles has been created. This should have updated the videoplayer.swf file that is in the ‘Website’ folder.
Go back to the ‘Website’ folder and open the html5video.htm  file in IE 6,7,8 to view the Flash fall-back. The subtitles should now be working there.

  • Go back to the ‘Website’ folder and open the html5video.htm  file in IE 6,7,8 to view the Flash fall-back. The subtitles should now be working there.

Related posts:

Accessible HTML5 video for all
How to create a basic HTML5 webpage
Fall back to Flash
Current HTML5 subtitle support
Subtitle creation process
Link subtitles to video
Making subtitles work now
A Flash solution
Making it work now, on an Android device
Making it work now, on an Apple device
Thoughts on HTML5 video and subtitles - conclusion

Downloads

07 Making subtitles work now

Making the <track> tag work in modern web browsers

At the time of writing there are three JavaScript solutions that offer the required subtitle functionality to the <video> tag; Playr.js, MediaElement and BubbleJS.

Playr.js
The chosen JavaScript solution for this project is playr.js.(Instructions on downloading and using playr.js are outlined in Downloading and Using Playr.js)


Media Element
MediaElement.js http://mediaelementjs.com/, appears to be a robust alternative though the configuration is more complex than other available options.

BubbleJS
BubbleJS http://bubbles.childnodes.com/  is well designed and has the most potential for the creation of interesting video interaction in the future. The downside to this however is that it has some features which make it less compliant and easy to use. For example:
  • it only supports .srt subtitles
  • it has a complex setup which makes it difficult for beginners
  • the subtitle track is linked through JavaScript not by the <track> tag in the HTML.

Downloading and using playr.js

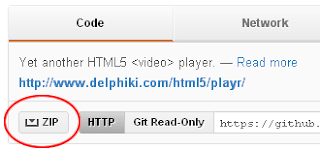
Playr.js is downloadable here: https://github.com/delphiki/Playr

Step 1:
  • Download the repository as a zip file by selecting the ZIP icon
Download repository as a zip button found at the site mentioned in the above text.

  • Unzip the files and then place them into the ‘website’ folder created earlier.
  • Delete the files called CHANGELOG.markdown and README.markdown(  they are not important for implementing subtitles).
Your website folder should now include these files and folders:
  • videoplayer.fla
  • videoplayer.swf
  • SkinUnderPlayStopSeekCaptionVol.swf
  • html5videoex.mp4
  • html5videoex.webm
  • html5video.htm
  • subs.vtt
  • subs.xml
  • playr.js
  • playr.css
  • images (folder)
Links to the downloaded JavaScript files, videos and website folder can be found at the bottom of the page.


Step 2:
Now link the required files to the webpage.
  • Change the <head> of the HTML to appear as below:  (This will link the required JavaScript to the webpage.)


<head>
<title>My HTML5 Video Page</title>
<link rel="stylesheet" type="text/css" href="playr.css" />
<script src="playr.js" type="text/javascript"></script>
</head>


Step 3:
To enable the JavaScript a small change needs to be made to the <video> tag.
  • Update the <video> tag so that it matches below:
<video class="playr_video" width="640" height="360" controls="controls">
  • Save and test the web page in a modern browser.
Subtitles should appear on the page over the video, if they do not, use the video controls that appear underneath the video to show the captions.*

NOTE: * There is a current issue (April 2012) with Google Chrome where the subtitles will not appear unless the video is being viewed over the internet. Local computer testing does not work. Either upload the ‘website’ folder to the internet or test using another browser such as Firefox.

Related posts:

Accessible HTML5 video for all
How to create a basic HTML5 webpage
Fall back to Flash
Current HTML5 subtitle support
Subtitle creation process
Link subtitles to video
Making subtitles work now
A Flash solution
Making it work now, on an Android device
Making it work now, on an Apple device
Thoughts on HTML5 video and subtitles - conclusion

Downloads

06 Link subtitles to video

Once you have created and saved the subtitles they have to be linked to the video on the webpage. This post will discuss:

Embedding subtitles using HTML5 only
The section ‘Embedding Subtitles using HTML5 only’ will describe how subtitles will be provided to HTML5 based websites in the future.

Before starting
  • Move the subs.srt, subs.vtt and the subs.xml file to the ‘website’ folder that was created earlier
All files required should now be in the same folder, encoded video files, HTML5 web pages and the subtitle files. It is important to ensure that all sub title files are available in the ‘website’ folder. This will make files ready to work with and link to the HTML5 encoded video.
The website folder should contain these files:
  • videoplayer.fla
  • videoplayer.swf
  • SkinUnderPlayStopSeekCaptionVol.swf
  • html5videoex.mp4
  • html5videoex.webm
  • html5video.htm
  • subs.srt
  • subs.vtt
  • subs.xml
Links to the completed subtitles, videos and website folder can be found at the bottom of the page.

Embed subtitles using HTML5 only

These instructions will provide the HTML5 code for embedding subtitles. Before starting, open the html5video.htm webpage that was created earlier. That web page contained 3 links to 2 videos:
  • html5videoex.mp4
  • html5videoex.webm
Two of the links in this page were for HTML5 enabled devices and the other was for the Flash based fall back if the browser didn’t support HTML5. The HTML code in this webpage currently appears as:

Current code


<body>
<video width="640" height="360" controls="controls">
<source src="html5videoex.mp4" type="video/mp4" />
<source src="html5videoex.webm" type="video/webm" />
<object id="flashContent" type="application/x-shockwave-flash" data="videoplayer.swf" width="640" height="400">
<param name="movie" value="videoplayer.swf" />
<p>Download the Flash plugin from <a href="http://www.adobe.com" title="Download Flash plugin">www.adobe.com</a></p>
</object>
</video>
</body>


Updated code
Add the line of code below after the <source> tags and before the <object> tag to create the link to the subtitle:

<track src="subs.vtt" kind="subtitles" srclang="en" label="English subtitles" default />

The <track> tag is all that is required to meet the proposed HTML5 specification of providing subtitles.
Currently there are no browsers that render the subtitles from the <track> tag only and therefore a JavaScript solution must be provided. This is discussed in the ‘Making Subtitles Work Now’ post (The link to this can be found at the end of this page).

src – this is the location and name of the subtitle file
kind – specifies whether captions, subtitles, chapters, descriptions or metadata are being provided.
srclang – the language of the track
label – the title of the track
default – specifies that the track is enabled by default. Many track elements can be used for the same video.

The webpage code now with the <track> tag included appears as below:

<body>
<video width="640" height="360" controls="controls">
<source src="html5videoex.mp4" type="video/mp4" />
<source src="html5videoex.webm" type="video/webm" /> 
<track src="subs.vtt" kind="subtitles" srclang="en" label="English subtitles" default />
<object id="flashContent" type="application/x-shockwave-flash" data="videoplayer.swf" width="640" height="400">
<param name="movie" value="videoplayer.swf" />
<p>Download the Flash plugin from <a href="http://www.adobe.com" title="Download Flash plugin">www.adobe.com</a></p>
</object>
</video>
</body>
  1. Save the changes to the web page and test the result in a browser. In future versions of web browsers this is all that will be needed to get subtitles to work. As of April 2012* there are no browsers that support the <track> tag.
NOTE*: Web Developers should make sure that the sites and pages that are developed, work on all commonly used web browsers including old and new. It is expected that IE8, that does not have <video> tag support will be in common use for the next few years, 2015 and beyond. Therefore while the <track> tag will start to become more widely incorporated into future browsers web developers will still need to make sure that subtitles are available in older browsers that don’t support <track>.

Related posts:

Accessible HTML5 video for all
How to create a basic HTML5 webpage
Fall back to Flash
Current HTML5 subtitle support
Subtitle creation process
Link subtitles to video
Making subtitles work now
A Flash solution
Making it work now, on an Android device
Making it work now, on an Apple device
Thoughts on HTML5 video and subtitles - conclusion

Downloads

05 Subtitle creation process


Universal Subtitles/Amara* was identified as the best tool for creating initial subtitles. The interface is easy to navigate and does not contain any more tools than are needed for each step which saves time.

NOTE*: If video can’t be uploaded to an internet location it is recommended that Subtitle Workshop is used to create subtitles instead.


The following steps provide instructions for creating subtitles in Universal Subtitles/Amara.

Step 1:
Upload the video onto a video hosting site (ie YouTube, Vimeo ) or any site or web server that you have access to.

Step 2:
The Universal Subtitles/Amara website and instructions on how to create subtitles are provided in the link * below. The site contains short instructional videos for each step. Step 3 below contains instructions on how to save the subtitles to your computer.

http://www.universalsubtitles.org/

NOTE*: Due to an imminent name change from Universal Subtitles to Amara the web link above will likely change. If the link is not working it would be best to search for ‘Universal Subtitles Amara’.


Step 3:
Save the subtitles to your computer.
  • select the ‘Download subtitles’ button at the end of the final step
Download subtitles button at Universal Subtitles/Amara


  • copy the text from the text box(this contains the actual subtitles)


Text box displayed after the Download Subtitles button is selected.


  • open any text editor such as Notepad on the PC or TextEdit on the Mac
  • paste the copied text into the text editor
Subtitles created by Universal Subtitles need the first 3 lines removed.

  • delete the first 3 lines from the file, these relate to Universal Subtitles/Amara requirements only.
  • save the file as subs.srt
Step 4:
Convert the file from subs.srt to subs.vtt *
  • navigate to this website: http://atelier.u-sub.net/srt2vtt/ (search string used to find this site initially was ‘convert srt to webvtt’)
  • upload the subs.srt file by selecting ‘Choose File’
  • select the ‘Convert me please’ button
  • the converted, WebVTT (.vtt) file will download
NOTE*: The differences between .srt and .vtt are currently slight. A properly formatted .vtt file has WEBVTT at the top of the file and then a blank line and replaces commas in the time format with decimal points.


Image hilighting the differences between the srt and vtt formats as described in the notes preceeding the picture.


Step 5:
Convert the file subs.srt to .xml for Flash
  • Navigate to this website*: http://vsync.tunezee.com/convertCaption.html
    (search string ‘srt to timed text’).
  • Select ‘Choose file’ and choose the subs.srt file created earlier.
  • Choose W3C Timed Text from ‘Output format’.
  • Select the ‘Convert’ button.
  • Download the converted file.
NOTE*: This site uses a PopUp window to process the file conversion. Check that the PopUps are unblocked on your browser. 

Related posts:

Accessible HTML5 video for all
How to create a basic HTML5 webpage
Fall back to Flash
Current HTML5 subtitle support
Subtitle creation process
Link subtitles to video
Making subtitles work now
A Flash solution
Making it work now, on an Android device
Making it work now, on an Apple device
Thoughts on HTML5 video and subtitles - conclusion

04 Current HTML5 subtitle support


In the current proposed HTML5 standard the <video> tag contains a <track> tag used for supplying a link to a subtitle file.

At the time of writing (April 2012) there is no support for providing subtitles using the <track> tag in HTML5 enabled websites displaying video. While the <track> tag remains unsupported by all current browsers a few developers have created JavaScript libraries (JavaScript is code which makes web pages very interactive) that add the required functionality to the <track> tag.

The proposed subtitling format for HTML5 video is WebVTT which is based on SubRip .SRT and there are JavaScript libraries available that support it.

WebVTT (.vtt) has a lot of support and will likely remain the format used for subtitling HTML5 video into the future. This is a positive outcome as it is possible to demonstrate the correct way to create and incorporate subtitles that work now and remain relevant when the HTML5 specification is completed.

Browser and device subtitle requirements

While JavaScript libraries solve the problem of the lack of subtitle support in modern HTML5 browsers it does not completely solve the problem for:
  • older browsers using the Flash based fall back
  • mobile devices (iOS and Android*), even though they have HTML5 enabled browsers installed.
To create subtitles that will work in all situations there needs to be 3 different subtitle formats provided. These formats are:
  • WebVTT (.vtt) for modern web browsers on a desktop or laptop computer
  • SubRip SRT (.srt) for use with iOS devices
  • XML (.xml) for Flash fall back and an Android solution.
It is possible to create the SubRip format and convert that into the other formats using freely available web based tools.

Subtitle software

Subtitles are required to make video accessible to all users.  The process of making subtitles involves creating an initial subtitle in the SubRip SRT format then converting it into WebVTT and XML for Flash.
The WebVTT format is used by HTML5 to provide subtitles and is relatively new. Consequently, tools that export directly to this format are hard to find. Currently WebVTT only works on desktop and laptop computers running modern browsers with a JavaScript solution.

WebVTT validator : http://quuz.org/webvtt/

The table below provides information on free subtitling options which have been tested in this project.  These options can be used to create subtitles which can be converted to WebVTT format for HTML5 web pages.


Subtitling tool
Creates WebVTTOperating systemEase of use
1= difficult, 5= easy
FreeWeb based solutionTime to subtitle 3min video
Subtitle WorkshopNoWindows only4YesNo1 hour
MAGpieNoWindows only2YesNo2 hours
AegisubNoWindows and Mac1 – could not get it to work effectivelyYesNoUnsuccessful
Universal Subtitles/AmaraNoAny operating system with a web browser.5YesYes20 minutes
*No software tools that could support export to the WebVTT format were identified.


The two software programs which standout as being of the most use are discussed below.

Subtitle Workshop
This tool plays MP4 encoded files. This is a feature which is unavailable in other tools.  While it is easy to use the interface, it is not completely intuitive and requires regular access to the help files. While Subtitle Workshop does not directly create WebVTT (.vtt) files, the conversion process from the .srt type is exceedingly easy.

Universal Subtitles/Amara
This is excellent and is by far the easiest subtitling tool available. There are 3 simple steps that are explained clearly at the beginning of each step via short video instructions. This tool is the simplest tool for the beginner to use.

Universal Subtitles/Amara is a web based tool. This means that the video being worked on will need to be uploaded to a video hosting site (ie YouTube, Vimeo, your personal website) in order to apply subtitles. The video can then be removed once subtitling has been completed.

During the project trials, Universal Subtitles/Amara was used to create the initial subtitles file. The file was then converted into a WebVTT file later. In the future it is expected that WebVTT will become the standard for delivering subtitles and there will be more software available that will export directly to WebVTT. 

Related posts:

Accessible HTML5 video for all
How to create a basic HTML5 webpage
Fall back to Flash
Current HTML5 subtitle support
Subtitle creation process
Link subtitles to video
Making subtitles work now
A Flash solution
Making it work now, on an Android device
Making it work now, on an Apple device
Thoughts on HTML5 video and subtitles - conclusion

03 Fall back to Flash

Currently Internet Explorer 6/7/8 have 24% of the browser market and do not support the HTML5 video tag at all. In this case, some users who are using one of these browsers may not be able to access the video content at all. In this case a fall back to Flash Player is required, as it will more than likely be installed on most computers.  To create the fall back to Flash, a Flash video player which supports subtitles and provides helpful advice on how to incorporate them is needed.

If it isn’t possible to find a Flash video player that supports subtitles, it is possible to create one that does. First the creation of a standard Flash based video player will be demonstrated and later attaching subtitles to it will be discussed.

How to create your own Flash video player

This link provides instructions on how to create a Flash video player:
http://www.youtube.com/watch?v=CnZTkKaEIRI

The steps below are a guide to creating a Flash video player.

Links to the completed Flash files, videos and website folder can be found at the bottom of the page.


Steps Comments
Open Adobe Flash and create a new file. The information in this table works on Flash CS versions 3 and above.
Save the file as videoplayer.fla into the ‘website’ folder where the HTML5 ready videos are stored. When this step is complete the website folder should contain:
  • videoplayer.fla
  • html5videoex.mp4
  • html5videoex.webm
  • html5video.htm
Resize the Flash document to the dimensions of the video. Add 40 pixels to the height of the Flash document to make room for the video controls added later. Using Finder (on the Mac) or My Computer on Windows:
  1. Select the video, from information that shows the video dimensions.
or
  1. Open the video in an application such as QuickTime. In QuickTime open the Movie Inspector window.
  2. In VLC from the menu and select:

    Tools > Media Information > Codec
Open the ‘Components’ window from the top menu in Flash. Select Window > Components
From the Components window choose Video.
From the Video options choose FLVPlayback click, drag and release this onto the document.
Close the ‘Component’ window.
Set the dimensions (height and width) of the FLVPlayback component, to the same dimensions as the video. Select the FLVPlayback component by clicking on the video object on the document, not the one that is in the component window. Once selected height and width options are made available in the Properties panel.
Position the FLVPlayback component so that its top left corner sits in the top left corner of the document. Or, select the FLVPlayback component by clicking on the video object on the document and setting the X and Y values in the Properties panel both to 0.
Open the ‘Component Inspector’ window from the top menu. Select Window > Components Inspector
Select the FLVPlayback component. Select the FLVPlayback component by clicking on the video object on the document
From the ‘Component Inspector’ window choose ‘skin’. ‘skin’ refers to the controls of the video player – play, stop, pause etc.
Scroll down the list of options and choose: SkinUnderPlayStopSeekCaptionVol This places the controls under the video. The ‘skin’ will have play, stop, seek, caption and volume controls.
Click OK.
From the ‘Component Inspector’ window choose ‘source’. Source is used to set the link, or path, to the video.
Select Browse and locate the MP4 video created earlier. The video player being constructed should be in the same folder (website) as the HTML5 videos prepared earlier. Therefore the MP4 video should be visible when Browse is selected.
Click OK.
Save the changes that have been made.
Press Ctrl-Enter on a PC or Command-Return on a Mac to publish your video. The video should display in a Flash window.

Troubleshooting

Video not working:
  • Check the ‘source’ is set correctly in the Component Inspector
  • Make sure that the MP4 video has been encoded with H.264. Use Handbrake to re-encode if necessary.
Done The website folder should now contain these files:
  • videoplayer.fla
  • videoplayer.swf
  • SkinUnderPlayStopSeekCaptionVol.swf
  • html5videoex.mp4
  • html5videoex.webm
  • html5video.htm

You are now ready to insert the Flash video fall back into your HTML5 webpage.

Insert the Flash video fall back for IE 6/7/8

The instructions below are a guide to inserting code for the Flash video fall back into older browsers (IE 6,7,8).

Update your webpage, html5video.htm, using the code below.

<body>
<video width="640" height="360" controls="controls">
<source src="html5videoex.mp4" type="video/mp4" />
<source src="html5videoex.webm" type="video/webm" />
<object id="flashContent" type="application/x-shockwave-flash" data="videoplayer.swf" width="640" height="400">
<param name="movie" value="videoplayer.swf" />
<p>Download the Flash plugin from <a href="http://www.adobe.com" title="Download Flash plugin">www.adobe.com</a></p>
</object>
</video>
</body>

Related posts:

Accessible HTML5 video for all
How to create a basic HTML5 webpage
Fall back to Flash
Current HTML5 subtitle support
Subtitle creation process
Link subtitles to video
Making subtitles work now
A Flash solution
Making it work now, on an Android device
Making it work now, on an Apple device
Thoughts on HTML5 video and subtitles - conclusion

Downloads

02 How to create a basic HTML5 webpage

The only tags required to make a HTML5 web page are listed below.  All other HTML tags fit within this structure, normally within the body tag. The HTML5 <video> tag is also included in the body tag.

<!DOCTYPE html>
<html>
<head>
<title>My HTML5 Page</title>
</head>
<body>
<p>Webpage content such as text, images and video go here</p>
</body>
</html>

Create the video tag and link the video

Before adding an HTML5 encoded video into a webpage, videos will need to be HTML5 encoded and a link added to the video on the HTML5 webpage.

The following sections will provide instructions on:
  • creating an HTML5 encoded video
  • creating an entire HTML5 web page that includes a link to a video.

How to create HTML5 encoded video

Step 1

  1. Choose a video to add to the page.
  2. Rename the file to something simple (for this example the video will be referred to as html5videoex).
  3. Convert this file into 2 different formats, so you will have two video files created from the original source file html5videoex:  
  • html5videoex.mp4
  • html5videoex.webm
Creating a WebM Video


To convert video files to WebM format, try any of the software found here:
http://www.webmproject.org/tools/#non-commercial-webm-tools *

NOTE* The software in this site contains some tools which are web based and are therefore not tied to a single computer operating system.

After testing software, the results in this project show that Firefogg is a suitable tool.

http://firefogg.org

A video example of using Firefogg to convert files to the WebM format can be found here:
ttp://www.youtube.com/watch?v=UyhXlLIV1vY

Creating a MP4 video


The results from this project show that Handbrake* (or any other MP4 convertor including iTunes and QuickTime) is a useful tool for creating an MP4 video. Handbrake is available on Mac OSX and Windows and is free.

NOTE*: In some applications (ie Handbrake) there is an option to choose the format of the final file type.  In this case MP4 should be selected and H.264 should be selected from the video codec section. These are the default options in Handbrake but may not be in other software.


http://handbrake.fr/

A video example of using Handbrake to convert video to the MP4 (H.264) format can be found here:
http://www.youtube.com/watch?v=IJqLwRoZy1A

Step 2

This step involves setting up a website folder where videos can be stored along with all other media and documents for the webpage. 
  • Create a folder named ‘website’ to store the videos and any webpages etc.
  • Place the formatted videos html5videoex.mp4 and html5videoex.webm into the ‘website’ folder
Links to the completed video files and website folder can be found at the bottom of the page.

Step 3

This step involves creating a web page in your favourite development software or text editor.
  • Use the HTML mark-up below to make a valid HTML5 web page.
<!DOCTYPE html>
<html>
<head>
<title>My HTML5 Video Page</title>
</head>
<body>
</body>
</html>
  • Save the file as html5video.htm into the ‘website’ folder where you stored the correctly formatted video.
In the ‘website’ folder you should now have:
  1. html5video.htm
  2. html5videoex.webm
  3. html5videoex.mp4

Step 4

This step involves adding the video to the webpage.
  • Open the html5video.htm file
  • Place the  HTML mark-up* below, between the opening and closing body tags:
NOTE* Always put the MP4 video first. Some Apple devices at the time of writing only process the first source tag. If the MP4 is at the bottom of the list it may not play in iOS devices such as iPad.


<body>
<video width="640" height="360" controls="controls">
<source src="html5videoex.mp4" type="video/mp4" />
<source src="html5videoex.webm" type="video/webm" />
Your browser does not support video, please take this opportunity to download a new browser.
</video>
</body>
  • Save the changes made to the html5video.htm file and open it in a browser.*
NOTE* If your video looks distorted adjust the width and height attributes in the video tag to your video dimensions.


Video doesn’t work

If the video doesn’t work, check all of the following:
  • the file path to the video is incorrect (Check the file path and amend if needed)
  • review the HTML mark-up coding for inconsistencies
  • if you see the “your browser does not support video…” text you are using an older browser that needs to be upgraded (instructions on how to supply video to older browsers will be provided in following posts).

The video did work, so what is it doing?

Firstly the browser detects the <video> tag and then looks for the <source> tag. The <source> tag tells the browser where to find the video. If the browser does not know how to process the first video, in this case the MP4 video file, it will move on to the second <source> tag and use that.

Some older browsers may not understand the <video> tag at all so the movie won’t work despite there being several sources. In this case there is the option to fall back to flash.

Related posts:

Accessible HTML5 video for all
How to create a basic HTML5 webpage
Fall back to Flash
Current HTML5 subtitle support
Subtitle creation process
Link subtitles to video
Making subtitles work now
A Flash solution
Making it work now, on an Android device
Making it work now, on an Apple device
Thoughts on HTML5 video and subtitles - conclusion

Downloads

01 Accessible HTML5 video for all

What is this project about

This series of posts have been developed as a result of a project undertaken by Learning Development that explored different ways video and subtitles could be incorporated into a HTML5 based website.

The video was first incorporated into the website, then tested on new and old browsers and on mobile devices such as iPad, iPod, Android Phone and an Android tablet. The testing was designed to ensure that video was visible and usable in all new and old browsers and did not lack accessibility features such as subtitles.

The posts will provide advice and instructions on how to incorporate video into a HTML5 based website. They will:
  • discuss video formats required for HTML5 video
  • discuss subtitle formats and use in HTML5
  • identify some compression software that may help produce video in the right formats*
It is also hoped that the advice and instructions will not be overly complex and that only minor changes to the methods described in the posts will be required once HTML5 specification is fully accepted.

*Note: The posts discuss compression formats but do not cover video compression techniques in great detail.

What is HTML and HTML5?

HTML is a code language which is used to develop webpages. It is the code that makes webpages look and act the way they do. For example, HTML coding will tell the webpage what text colours to use, what to do when the user clicks on a link, when to play a video, or what happens when the user rolls the mouse over an image. HTML5 is the name given to the updated HTML standard.

Almost every web page on the internet is made with, or incorporates, HTML. HTML was developed initially in 1990 by Tim Berners-Lee and was last updated to its current standard in 2000. However, since the introduction of mobile devices there has been a need to adapt the current HTML standard to suit these emerging technologies.  For example, HTML is now being upgraded to include interactive features such as video and audio which can be viewed without 3rd party plugins.

Although HTML5 is still in the process of developing, it is expected that HTML5 will soon replace current HTML technology and many developers and websites are making the transition now.

Is HTML5 widely supported?

To add a video into an HTML5 webpage, the tag <video>is added to the coding.

All new browsers support the <video> tag and some or most of the recommended HTML5 features.

However, as HTML5 is currently under development it may be necessary to provide multiple video formats to be sure that the video will display in both old and new browsers (required video formats are discussed in the section Video Formats below).

To see how well your browser supports HTML5 visit http://html5test.com/.

Watching video on the web

The current HTML standard doesn’t support video being played directly from webpages. Therefore, in order to view videos attached to webpages, the user is required to download 3rd party plugins such as Flash or QuickTime.

As 3rd party plugins, such as Flash, can drain the battery of mobile devices and affect performance overall, both Apple and Microsoft have made the decision to support the development of HTML5 as a way of replacing the need to download plugins*. In addition to this Adobe, the developer of the Flash player, have announced that it will no longer update its mobile Flash player and that it fully supports the proposed HTML5 standard.

*See Steve Jobs’ article Thoughts on Flash’ http://www.apple.com/hotnews/thoughts-on-Flash/.

How to put video on my HTML5 webpage

Video formats

Currently, as of April 2012, HTML5 has not confirmed which video formats will be supported. In the meantime, to make sure all users of a site can see the video on any computer or mobile device, videos should be supplied in multiple formats. For example, the formats that must be offered at a minimum are:
  • MP4 (H.264)
  • WebM
  • OGG was used by earlier versions of Firefox and should be considered as a format still worth supplying
How HTML5 works with multiple formats


The HTML5 <video> tag works using a fall back method.  This means that a browser that cannot view one video format, will fall back to using the next in the queue. If the browser still does not understand the video format it can keep looking through the <video> tag for more information or a format that it does understand.

Some very old browsers don’t support the HTML5 video tag at all. In this case another format that can be offered is the FLV file type.  Flash also supports the MP4 video codec so it is not overly important to supply the FLV format type as well. The MP4 video must be H.264 encoded to work with a Flash video player.

Related posts:

Accessible HTML5 video for all
How to create a basic HTML5 webpage
Fall back to Flash
Current HTML5 subtitle support
Subtitle creation process
Link subtitles to video
Making subtitles work now
A Flash solution
Making it work now, on an Android device
Making it work now, on an Apple device
Thoughts on HTML5 video and subtitles - conclusion